What’s the Best Way to Clean Up Oil Spills on Land & Water is a critical question for industrial teams, facility managers, marine workers, and small business owners who face unexpected oil leaks or spills daily. Oil spills—whether small leaks in a workshop, larger drips on a factory floor, or accidental runoff into ponds, rivers, or shorelines—pose immediate risks to the environment, local wildlife, and regulatory compliance. A rushed or improper cleanup not only leaves behind toxic residue but can also lead to steep fines, long-term soil and water damage, and costly remediation work.
This comprehensive guide breaks down proven, easy-to-follow cleanup methods for both land and water surfaces, highlights the right tools for every scenario, and shares expert tips to work efficiently while protecting ecosystems and avoiding common mistakes. Whether you’re handling a minor motor oil spill or a larger industrial oil leak, these strategies will help you act fast, contain the mess completely, and finish the cleanup safely without unnecessary waste or risk.
 Why Finding the Best Way to Clean Up Oil Spills on Land & Water Matters for Every User
 Why Finding the Best Way to Clean Up Oil Spills on Land & Water Matters for Every User
Many people underestimate the long-term impact of untreated or poorly cleaned oil spills, especially when they happen on both land and nearby water sources. Oil is a non-biodegradable substance that seeps deep into soil, clogs plant roots, and contaminates groundwater; in water, it forms a thick layer that blocks oxygen, harms fish and birds, and disrupts entire aquatic ecosystems. Taking the time to use the correct cleanup method protects more than just the immediate area—it safeguards public health, avoids regulatory penalties from environmental agencies, and preserves natural habitats for years to come.
- Environmental Protection: Proper cleanup stops oil from spreading to nearby waterways, soil, and vegetation, preventing irreversible damage to sensitive ecosystems and wildlife.
- Regulatory Compliance: Most regions have strict rules for oil spill response and disposal; following approved methods helps you avoid fines and legal trouble for improper contamination control.
- Safety for Workers & Users: Oil creates slippery, flammable surfaces; a thorough cleanup eliminates slip risks and fire hazards for anyone working in or near the spill area.
- Cost Savings: Fast, effective cleanup avoids expensive long-term remediation, soil replacement, or water treatment that comes from neglected spills.
The best cleanup approach varies sharply between land and water, as each surface has unique challenges—soil absorbs oil quickly, while water allows oil to spread rapidly with currents or wind. Understanding these differences is key to choosing the right tools and steps for full, safe removal.
Key Differences Between Oil Spill Cleanup on Land vs. Water
 Key Differences Between Oil Spill Cleanup on Land vs. Water
Before diving into step-by-step methods, it’s vital to understand how land and water spills behave differently, as this directly shapes the best way to clean up oil spills on land & water. Using a water-focused method on land (or vice versa) will waste time, leave oil residue, and fail to contain the spill fully.
Spill Location | Core Challenges | Top Priorities for Cleanup | Ideal Absorbent Tools |
|---|---|---|---|
Land (concrete, soil, gravel, workshop floors) | Oil seeps quickly into porous surfaces, hard to remove residue, risk of runoff to drains | Block drain access, contain spill spread, absorb fully without pushing oil deeper | |
Water (ponds, lakes, rivers, shorelines) | Oil spreads fast with wind/currents, floats on the surface, and harms aquatic life quickly | Contain floating oil first, prevent drift to shore, absorb without polluting the water further |
For mixed scenarios (oil spills on land that risk reaching water), you’ll need to combine both land and water cleanup tactics to create a full barrier and stop cross-contamination. This dual approach is often the most effective way to handle large or unplanned spills that threaten both surfaces.
Step-by-Step: Best Way to Clean Up Oil Spills on Land (All Surface Types)
 Step-by-Step: Best Way to Clean Up Oil Spills on Land (All Surface Types)
Cleaning up oil spills on land follows a consistent, logical flow that prioritizes containment first, then absorption, and final disposal. This sequence ensures you don’t spread the oil further or push it into drains, soil, or nearby water sources. These steps work for small household spills, garage leaks, and large industrial land spills alike.
Step 1: Secure the Area & Stop the Spill Source
 Step 1: Secure the Area & Stop the Spill Source
- First, shut off any equipment causing the leak (pumps, machinery, storage tanks) to stop more oil from flowing out—this prevents the spill from growing larger.
- Block all nearby floor drains, gutters, and sewer openings with oil absorbent socks or rolled absorbent pads; this is the single most important step to stop oil from washing into water systems.
- Mark the spill area with caution signs to keep foot traffic and machinery away, avoiding slips and preventing oil from being tracked to other areas.
- Put on basic personal protective equipment (gloves, safety goggles) to avoid direct skin contact with oil, especially for industrial or chemical-based oils.
Step 2: Contain the Spill with Absorbent Barriers
 Step 2: Contain the Spill with Absorbent Barriers
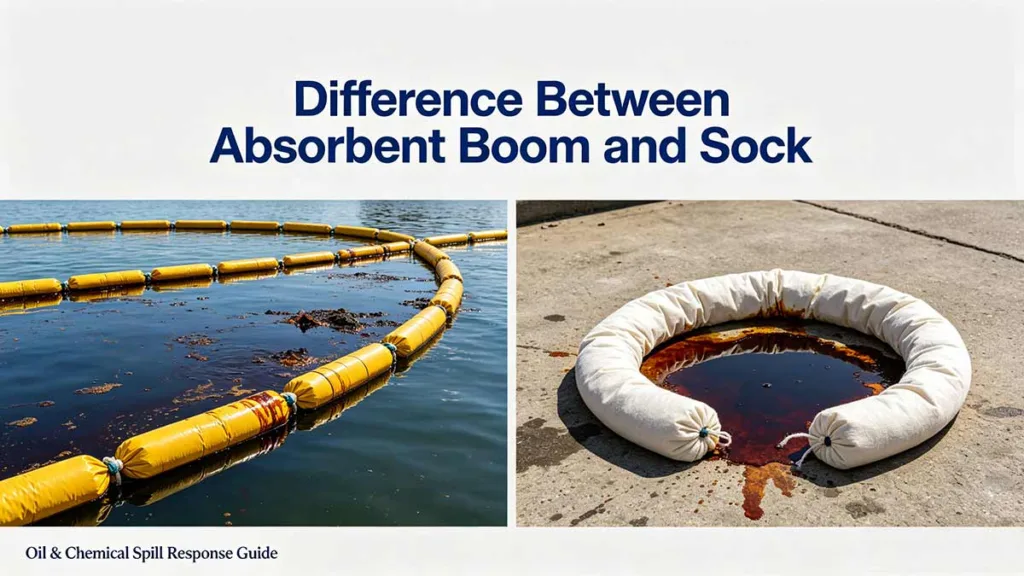
- Circle the entire spill with oil absorbent socks to create a closed barrier; these flexible socks trap oil at the edges and stop it from spreading across concrete or seeping into soil.
- For larger land spills, add extra absorbent socks around the perimeter and place oil absorbent pillows in pooled oil areas—pillows hold more volume for thick, deep spills.
- Avoid using water or cleaning solutions at this stage; water will only spread the oil and make cleanup far harder.
Step 3: Absorb the Oil Completely with Professional Tools
 Step 3: Absorb the Oil Completely with Professional Tools
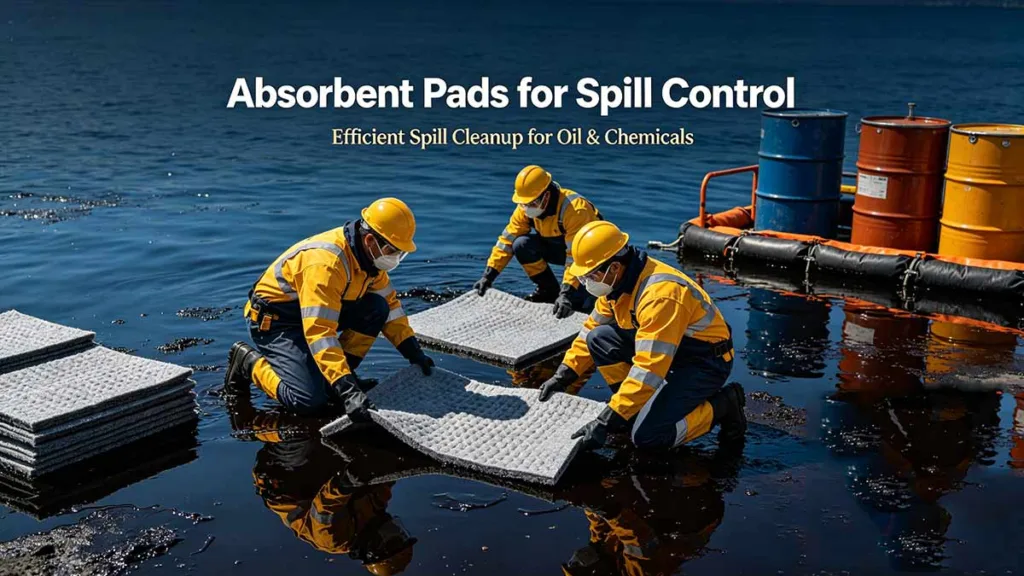
- Cover the entire spill surface with oil absorbent pads or oil absorbent rolls; press pads firmly into the oil to ensure full saturation, focusing on thick, pooled areas first.
- Replace saturated pads and rolls with fresh ones as needed, continuing until no visible oil remains and the surface feels dry to the touch.
- For porous surfaces like gravel or dirt, cover the area with a thick layer of absorbent material and let it sit for 10–15 minutes to pull oil from deep within the surface.
- For heavy-duty land spills, use oil absorbent pillows to soak up large volumes quickly, then follow with pads for fine residue removal.
Step 4: Dispose of Used Absorbents Safely
 Step 4: Dispose of Used Absorbents Safely
- Collect all saturated absorbent pads, rolls, socks, and pillows into a sealed, leak-proof container—never throw them in regular trash, as they’re considered hazardous waste.
- Follow local regulations for hazardous waste disposal or recycling of oil-contaminated materials; many industrial areas have designated drop-off points for these items.
- Wipe the surface one final time with a fresh pad to remove any leftover residue, ensuring no oil is left to seep into soil or drains later.
Step-by-Step: Best Way to Clean Up Oil Spills on Water (Small & Large Scale)
 Step-by-Step: Best Way to Clean Up Oil Spills on Water (Small & Large Scale)
Oil spills on water require fast action, as oil spreads rapidly across the surface and can reach shorelines, docks, or aquatic habitats in minutes. The best way to clean up oil spills on water focuses on floating containment first, then gentle absorption—never use harsh chemicals or detergents, as these will further pollute the water and harm marine life.
Step 1: Deploy Floating Barriers to Contain the Oil
 Step 1: Deploy Floating Barriers to Contain the Oil
- Unfurl oil absorbent boom around the entire floating oil slick; these floating barriers are designed to trap oil on water without absorbing water, keeping the spill contained in one spot.
- Adjust the boom to account for wind and water currents, ensuring no oil can escape under or around the barrier—secure boom ends to docks, shorelines, or buoys for stability.
- For narrow waterways or small ponds, use oil-absorbent socks alongside the boom to create a double barrier, especially near sensitive areas like plant life or animal habitats.
Step 2: Absorb Floating Oil Without Disturbing Water
- Place floating oil absorbent pads and oil absorbent pillows directly on the contained oil slick; these products repel water and only absorb oil, making them perfect for aquatic cleanup.
- Leave the absorbents in place until fully saturated, then remove them slowly to avoid dripping oil back into the water—use a net or tool to lift saturated pads without splashing.
- Repeat with fresh absorbents until the water surface is clear and no visible oil sheen remains; thin oil sheens may require multiple layers of pads for full removal.
- For shoreline water spills, use oil absorbent socks along the water’s edge to catch any oil that washes ashore, preventing it from seeping into coastal soil.
Step 3: Final Water & Shoreline Cleanup
 Step 3: Final Water & Shoreline Cleanup
- Check the shoreline and any nearby vegetation for trapped oil; use small absorbent pads to spot-clean affected areas without damaging plants or soil.
- Remove all absorbent boom and socks once the area is clear, and dispose of all water-based absorbents the same way as land absorbents (sealed hazardous waste containers).
- Avoid stirring up water or sediment during cleanup, as this can push oil underwater and make removal nearly impossible.
Essential Absorbent Products for Oil Spill Cleanup on Land & Water
 Essential Absorbent Products for Oil Spill Cleanup on Land & Water
Using the right absorbent tools is what makes the best way to clean up oil spills on land & water effectively and efficiently. Using generic or low-quality absorbents will leave residue, waste time, and fail to contain the spill fully. Below is a breakdown of our full professional product line and its ideal uses for every spill scenario, designed for maximum oil absorption and minimal environmental impact.
Product Type | Best For | Land or Water Use | Key Benefits |
|---|---|---|---|
Oil Absorbent Pads | Small spills, thin oil layers, and final residue cleanup | Both Land & Water | Lightweight, easy to deploy, absorbs oil fast without tearing |
Oil Absorbent Rolls | Large floor spills, long surface coverage, and custom cutting | Land Only | Continuous coverage, cost-effective for big areas, and tear-resistant |
Oil Absorbent Socks | Spill containment, drain blocking, and edge barriers | Both Land & Water | Flexible, conforms to uneven surfaces, traps oil completely |
Oil Absorbent Pillows | Thick, pooled oil, high-volume spills | Both Land & Water | High absorption capacity, heavy-duty, holds large oil volumes |
Oil Absorbent Boom | Floating oil containment, water surface barriers | Water Only | Floats steadily, repels water, and contains large oil slicks |
Chemical Absorbent Products (Pads, Rolls, Socks, Pillows, Boom) | Chemical spills, mixed oil/chemical leaks | Both Land & Water | Safe for harsh chemicals, universal absorption, non-reactive |
Oil Spill Kit & Chemical Spill Kit | Emergency response, all-in-one cleanup, ready-to-use | Both Land & Water | Includes all tools needed, compact storage, and fast deployment |
Each product is designed to target oil and chemical spills specifically, avoiding unnecessary water absorption and ensuring full, clean removal every time. Using dedicated absorbent products instead of household items like rags or sawdust is far more effective and reduces the amount of hazardous waste generated.
Common Mistakes to Avoid When Cleaning Up Oil Spills
 Common Mistakes to Avoid When Cleaning Up Oil Spills
Even with the best intentions, many users make simple mistakes that ruin cleanup efforts and cause more harm. Knowing these errors will help you stay on track and ensure the best way to clean up oil spills on land & water is executed correctly.
- Mistake 1: Using water to rinse oil spills – Water spreads oil across surfaces and pushes it into drains or soil, making cleanup exponentially harder and increasing contamination.
- Mistake 2: Skipping containment steps – Failing to block drains or deploy boom/socks lets oil spread to larger areas, turning a small spill into a major environmental issue.
- Mistake 3: Using the wrong absorbent type – General-purpose absorbents or household items don’t target oil effectively, leaving behind hidden residue and requiring more cleanup time.
- Mistake 4: Improper disposal of used absorbents – Throwing saturated oil absorbents in regular trash violates hazardous waste rules and can lead to fines or environmental contamination.
- Mistake 5: Rushing the absorption process – Removing pads or boom too soon leaves oil sheen or residue, requiring repeat cleanup and increasing long-term risks.
How to Choose the Right Setup for Your Spill Size
 How to Choose the Right Setup for Your Spill Size
Not all spills need the same tools—matching your absorbent setup to spill size ensures you don’t waste supplies and get a full cleanup on the first try. This quick guide helps you pick the right combination for any scenario.
- Small Spills (garage, small workshop, minor leaks): Oil absorbent pads + oil absorbent socks (for drain blocking) – Compact, fast, and perfect for daily small leaks.
- Medium Spills (factory floors, small ponds, equipment leaks): Oil absorbent rolls + pillows + socks – Covers more area and handles moderate oil volumes.
- Large Spills (industrial sites, shorelines, water bodies): Oil absorbent boom + full oil spill kit + chemical absorbent products (if needed) – Complete containment and absorption for big jobs.
- Chemical/Oil Mixed Spills: Dedicated chemical absorbent pads, socks, and spill kits – Safe for harsh substances and prevent dangerous chemical reactions.
Final Tips for Long-Term Spill Prevention
 Final Tips for Long-Term Spill Prevention
While knowing the best way to clean up oil spills on land & water is critical, preventing spills before they happen is even better. These simple steps reduce the risk of future leaks and keep your workspace or water areas safe year-round.
- Inspect storage tanks, machinery, and pipelines regularly for small leaks or cracks, fixing issues immediately before they turn into large spills.
- Keep oil spill kits and chemical spill kits easily accessible in all areas where oil is used or stored, so you can respond in seconds if a leak occurs.
- Train team members on proper spill response protocols, ensuring everyone knows how to deploy absorbent boom, pads, and socks correctly.
- Store oil containers in sealed, elevated areas to prevent runoff in case of leaks or accidental tipping.
Conclusion: Master the Best Way to Clean Up Oil Spills on Land & Water
 Conclusion: Master the Best Way to Clean Up Oil Spills on Land & Water
At the end of the day, the best way to clean up oil spills on land & water boils down to three core principles: fast containment, targeted absorption with professional tools, and safe disposal of all contaminated materials. Whether you’re handling a small land spill in a workshop or a larger water spill on a pond or river, following the step-by-step methods outlined here will ensure full, safe cleanup without harming the environment or risking regulatory penalties.
Using high-quality, purpose-built oil absorbent pads, rolls, socks, pillows, boom, and dedicated spill kits makes every cleanup faster, more effective, and less stressful. Our full line of oil and chemical absorbent products is designed to handle any spill scenario, from small daily leaks to large emergency situations, giving you the reliability you need to act confidently.
If you’re unsure which products fit your specific needs, need guidance on emergency spill response, or want to build a custom spill kit for your facility, our team is ready to help.
We can provide tailored recommendations to match your workspace, spill risks, and compliance requirements, so you’re always prepared to handle what’s the Best Way to Clean Up Oil Spills on Land & Water effectively.