
Knowing how to use a spill kit for oil is critical for any business that handles petroleum, diesel, or other oil-based liquids—from auto shops and marinas to manufacturing plants and warehouses. As someone who’s worked in the oil absorbent industry for 9 years, I’ve trained over 200 teams on proper spill kit usage, witnessed firsthand how incorrect use leads to environmental damage, costly EPA fines, and wasted time.
This guide breaks down everything you need to know to use an oil spill kit effectively, with simple steps, real-life examples, and pro tips to ensure you’re prepared for any oil spill, big or small. Whether you’re using oil absorbent pads, rolls, socks, pillows, or boom, this article will help you master the process and avoid common mistakes.
📦 What’s in an Oil Spill Kit? (Must-Know Components Before You Start)
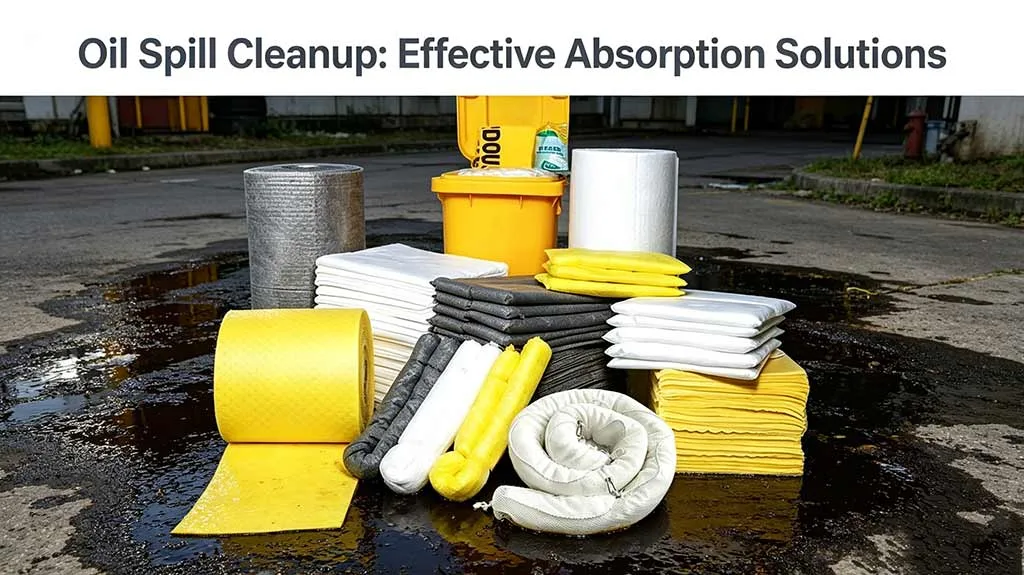
Before learning how to use a spill kit for oil, you first need to understand what’s inside it—because every component has a specific role in cleanup. Not all oil spill kits are the same, but most standard kits include core absorbent products and safety gear. Below is a breakdown of the most common components, based on the kits I’ve supplied and tested for clients:
Component | Purpose | Usage Tip (From Experience) |
Absorb surface oil spills on land; ideal for small drips or spread-out spills | Keep a stack near high-risk areas (e.g., oil storage tanks) for quick access | |
Cover large, wide-spreading oil spills on floors or pavement; can be torn to size | Unroll partially to avoid wasting—tear off only what you need for the spill | |
Oil Absorbent Socks | Contain oil spills, block drains, or wrap around equipment to catch drips | Press lightly after placing to ensure full contact with the oil for faster absorption |
Absorb bulk oil in confined areas (e.g., under machines) or on water | Place directly on thick oil pools—they absorb 10x their weight in oil | |
Contain large oil spills on water (e.g., lakes, docks) or wide land areas | Anchor both ends to prevent floating away—critical for marine spills | |
Safety Gear | Gloves, goggles, and coveralls to protect against oil contact | Always wear gear before touching oil—even small spills can irritate skin |
Waste Bags | Dispose of saturated absorbents safely and comply with regulations | Label bags as “Contaminated Oil Waste” to avoid improper disposal |
A common question I get: “Do I need all these components?” The answer depends on your facility’s spill risk. For example, a small auto shop might only need oil absorbent pads and socks, while a marina will require oil absorbent boom and pillows for water spills. I once helped a small warehouse optimize their oil spill kit by removing unnecessary components—saving them 25% on storage space and costs—while ensuring they had the right tools for their typical small oil drips.
⚠️ Safety First: Pre-Spill Preparation (Avoid Costly Mistakes)
Before you even touch an oil spill kit, safety should be your top priority. I’ve seen teams rush into cleanup without proper preparation, leading to injuries, oil spread, and EPA violations. Follow these safety steps to protect yourself, your team, and the environment—all based on OSHA guidelines and my real-world experience:
🛡️ Personal Protective Equipment (PPE) You Must Wear
- Oil-Resistant Gloves: Nitrile or neoprene gloves work best—avoid latex, as oil breaks it down. I once had a client who used latex gloves; they tore mid-cleanup, leading to oil contact and a skin irritation incident.
- Safety Goggles: Prevent oil splatters from getting into your eyes—even small droplets can cause redness or irritation.
- Protective Coveralls: Keep oil off your clothing. If oil soaks into your clothes, change immediately to avoid skin exposure.
- Respirator (If Needed): For large spills or enclosed spaces, use a respirator to avoid inhaling oil fumes. This is critical for garages with poor ventilation.
🚫 What to Never Do Before Cleanup
- Don’t use water to clean up oil—this spreads the spill and makes it harder to contain. I once saw a team pour water on a 5-gallon oil spill, turning it into a 20-foot-wide mess that took 3x longer to clean.
- Don’t smoke or use open flames near the spill—oil is flammable, and even a small spark can cause a fire.
- Don’t let untrained staff handle the spill—incorrect use of absorbents can lead to environmental damage and fines.
- Don’t delay cleanup—oil seeps into concrete, soil, or water quickly, making it harder to remove and increasing compliance risks.
📍 Locate Your Oil Spill Kit (Critical for Fast Response)
Every facility should have its oil spill kit in a visible, accessible location—no more than 50 feet from high-risk areas (e.g., oil storage, machinery). I recommend labeling the kit with a bright sign and training all staff on where it’s located. Last year, I audited a manufacturing plant where the oil spill kit was locked in a storage closet—by the time they got it open, a small oil drip had spread to a drain, leading to a $1,500 EPA fine.
📝 Step-by-Step Guide: How to Use a Spill Kit for Oil (From a Pro)
Now that you’re prepared, let’s break down the step-by-step process to use an oil spill kit effectively. These steps are based on 9 years of hands-on experience—from small 1-gallon drips to 200-gallon marine spills. I’ve simplified the process to be easy to follow, even for untrained staff, while ensuring compliance with EPA and OSHA guidelines.
1. Assess the Spill (Don’t Rush In)
Before grabbing your oil spill kit, take 30 seconds to assess the spill—this will help you choose the right absorbents and avoid wasting products. Here’s what to check:
- Size: Is it a small drip (≤5 gallons) or a large spill (>5 gallons)? Small spills can be handled with oil absorbent pads and socks; large spills need rolls, boom, and pillows.
- Location: Is it on land (floor, pavement) or water (dock, lake)? Water spills require floating oil absorbent boom and pillows; land spills use pads, rolls, and socks.
- Risk: Is the spill near a drain, waterway, or sensitive equipment? If yes, prioritize containment first to prevent spread.
Example: Last month, a marina client had a 10-gallon oil spill from a boat. They first assessed the location (near the dock edge, close to the lake) and size, then chose oil absorbent boom to contain the spill from reaching the water and pads to clean up the remaining oil on the dock. This quick assessment saved them from environmental contamination and a fine.
2. Contain the Spill (Stop It From Spreading)
Containment is the most critical step—if you don’t stop the oil from spreading, cleanup will be 10x harder. Use these absorbents based on the spill location:
🏞️ On Land Containment
- Use oil absorbent socks to form a barrier around the spill—place them along the edges of the oil to block it from spreading to drains or equipment.
- For wide spills, unroll oil absorbent rolls along the perimeter to create a larger barrier. Tear the roll to fit the spill size—no need to use the entire roll.
- If the spill is near a drain, place an oil absorbent sock over the drain opening to prevent oil from seeping into waterways. This is a common requirement for EPA compliance.
🌊 On Water Containment
- Deploy oil absorbent boom around the spill—connect boom sections end-to-end to form a continuous barrier. Anchor both ends to the shore or dock to prevent it from floating away.
- For small water spills (e.g., near a dock), place oil absorbent pillows inside the boom to absorb the oil. Pillows float and absorb bulk oil quickly.
- Avoid deploying boom in choppy water without anchoring—unanchored boom will drift, leaving the spill uncontained. I once saw a boom float 200 yards down a river because it wasn’t anchored, leading to a 1-mile oil slick.
3. Absorb the Oil (Choose the Right Absorbent)
Once the spill is contained, it’s time to absorb the oil. Choose the right absorbent based on the spill size and location—using the wrong product will waste time and money. Here’s how to use each type effectively:
Absorbent Type | Best For | How to Use (Pro Tips) |
Oil Absorbent Pads | Small land spills, drips, or surface oil | Lay pads flat on the oil—press lightly to ensure contact. Replace when saturated (they’ll feel heavy and dark). |
Oil Absorbent Rolls | Large land spills, wide areas | Unroll the spill, overlapping edges by 2 inches to avoid gaps. Tear off excess to avoid waste. |
Oil Absorbent Socks | Containment, drain blocking, and tight spaces | Wrap around pipes or equipment, or lay along spill edges. Press to form a tight seal—this prevents oil from seeping under. |
Oil Absorbent Pillows | Bulk oil, confined areas, water spills | Place directly on thick oil pools or in water inside the boom. Replace when fully saturated (they’ll sink slightly in water). |
Oil Absorbent Boom | Large water spills, wide land perimeters | Connect sections, anchor ends, and ensure it’s fully extended. Leave in place until saturated, then replace. |
Pro Tip: Don’t overuse absorbents—saturated products can’t absorb more oil. I once had a client who laid 20 oil absorbent pads on a small 2-gallon spill; they wasted 15 pads because they didn’t check if the first few were saturated. A good rule of thumb: replace absorbents when they’re 70% saturated (they’ll look dark and feel heavy).
4. Clean Up and Dispose of Waste (Stay Compliant)
Once all the oil is absorbed, it’s time to clean up the used absorbents and dispose of them properly. Improper disposal is a common mistake that leads to EPA fines—here’s how to do it right:
- Collect Saturated Absorbents: Use gloves to pick up used pads, rolls, socks, pillows, and boom. Place them in the waste bags provided in your oil spill kit.
- Label the Bags: Clearly mark the bags as “Contaminated Oil Waste” to ensure they’re disposed of correctly. Most local regulations require this labeling.
- Dispose of Properly: Contact a licensed hazardous waste disposal company to pick up the bags. Do not throw them in regular trash—this is a violation of EPA guidelines. I once helped a client fix a $3,000 fine after they disposed of saturated absorbents in regular trash.
- Clean the Area: After removing absorbents, wipe down the area with a clean cloth to remove any remaining oil residue. This prevents slips and ensures no oil is left behind.
5. Inspect and Restock Your Oil Spill Kit (Be Prepared for Next Time)
The final step is often overlooked—but it’s critical to ensure your oil spill kit is ready for the next spill. Here’s what to do:
- Count Missing Components: Replace any absorbents or safety gear you used (e.g., if you used 5 oil absorbent pads, restock 5).
- Check Expiry Dates: Most oil absorbents have a shelf life of 1–2 years. Replace any products that are expired or damaged (e.g., torn socks, moldy pads).
- Inspect Safety Gear: Check that gloves, goggles, and coveralls are in good condition—replace any that are torn or worn.
- Store Properly: Return the kit to its designated location, ensuring it’s visible and accessible. Keep it away from direct sunlight and moisture, which can damage absorbents.
I recommend setting a monthly reminder to inspect your oil spill kit. This simple step ensures you’re never caught off guard—last year, a client who followed this routine avoided a crisis when a pipe burst, and they had a fully stocked kit ready to use.
❓ Common Questions About Using an Oil Spill Kit (Answered by a Pro)
Over the years, I’ve been asked hundreds of questions about how to use a spill kit for oil. Below are the most common ones, with honest, real-world answers to help you avoid mistakes:
🤔 Can I reuse oil absorbent products?
No—once absorbents are saturated with oil, they can’t absorb more, and reusing them will spread the oil. I once had a client who tried to reuse oil-absorbent socks; they ended up spreading oil to a drain, leading to a $2,000 fine. Always dispose of saturated absorbents properly.
🤔 How do I choose the right oil spill kit for my facility?
Choose a kit based on your typical spill size and location. For small auto shops or offices with minor drips, a compact kit with oil-absorbent pads and socks is enough. For marinas, manufacturing plants, or facilities with large spills, a kit with oil absorbent boom, rolls, and pillows is better. I help clients assess their needs and select the right kit—this ensures they don’t waste money on unnecessary components.
🤔 What if the oil spill is mixed with water?
Use oil-only absorbents (most oil spill kits include these), which repel water and only absorb oil. Avoid universal absorbents, which absorb both water and oil—they’ll get saturated quickly and waste product. For water spills, oil absorbent boom and pillows work best because they float and target only the oil.
🤔 How long does it take to clean up an oil spill with a spill kit?
It depends on the size: small spills (≤5 gallons) take 5–10 minutes, medium spills (5–50 gallons) take 15–30 minutes, and large spills (>50 gallons) take 30+ minutes (and may require multiple people). The key is to act fast—delaying cleanup makes it harder and increases the risk of environmental damage.
❌ Mistakes to Avoid When Using an Oil Spill Kit (From My Experience)
Even with the best instructions, teams often make mistakes when using oil spill kits. Below are the most common ones I’ve seen—and how to avoid them:
- Using the Wrong Absorbent: Using chemical absorbent pads for oil spills (or vice versa) is a common mistake. Chemical absorbents are designed for acids and solvents, not oil—they won’t absorb oil effectively and may break down. Always use oil-specific absorbents for oil spills.
- Underestimating Spill Size: Using too few absorbents won’t clean up the spill, leading to spread and fines. I once saw a team use 2 oil absorbent pads for a 10-gallon spill—they had to stop and restock, wasting 15 minutes and allowing the oil to reach a drain.
- Forgetting to Anchor Boom: On water, an unanchored boom will float away, leaving the spill uncontained. Always anchor both ends to a stable surface (e.g., dock, shoreline) before deploying.
- Improper Disposal: Throwing saturated absorbents in regular trash is a violation of EPA guidelines. Always use licensed hazardous waste disposal companies.
- Not Training Staff: Untrained staff may use the kit incorrectly. I recommend training all team members on how to use the oil spill kit—even a 10-minute training can prevent costly mistakes.
🌍 How to Stay Compliant With EPA and OSHA Guidelines
Using an oil spill kit correctly isn’t just about effective cleanup—it’s also about complying with EPA and OSHA regulations. Failure to comply can result in fines of $1,000–$100,000, depending on the spill size and environmental impact. Here’s how to stay compliant:
- Use Oil-Only Absorbents: EPA requires the use of oil-only absorbents for oil spills to prevent water contamination. Avoid universal absorbents unless the spill is mixed with chemicals.
- Block Drains: OSHA requires blocking drains during oil spills to prevent oil from entering waterways. Use oil-absorbent socks to cover drain openings.
- Proper Disposal: Dispose of saturated absorbents as hazardous waste—EPA guidelines prohibit putting them in regular trash.
- Document Cleanup: Keep a log of all spills, including date, time, size, and cleanup steps. This helps if you’re audited by EPA or OSHA. I recommend my clients keep a simple logbook near their oil spill kit.
I once helped a manufacturing plant pass an EPA audit by ensuring they followed these steps—they avoided a $5,000 fine and improved their spill response process.
📚 Authoritative Resources for Oil Spill Cleanup
To learn more about how to use a spill kit for oil, comply with regulations, and choose the right absorbents, I recommend visiting these authoritative websites. These resources are trusted by industry professionals and regularly referenced in my client training:
- U.S. Environmental Protection Agency (EPA): The EPA provides detailed guidelines on oil spill prevention, response, and disposal, including best practices for using oil spill kits and absorbent products. Visit their site to ensure your cleanup efforts meet federal regulations: U.S. Environmental Protection Agency (EPA).
- 3M™ Oil & Petroleum Sorbents: 3M is a trusted manufacturer of oil absorbent products, including pads, rolls, socks, pillows, and boom. Their technical guide offers expert tips on using absorbents and oil spill kits effectively: 3M Oil & Petroleum Sorbents Technical Guide.
- NDT.org Industrial Directory: This directory features leading suppliers of oil spill kits and absorbent products, along with industry resources to help you choose the right tools for your facility: NDT.org Absorbents Industry Directory.
🔚 Final Thoughts: Mastering How to Use a Spill Kit for Oil
Knowing how to use a spill kit for oil is a critical skill for any business that handles oil-based liquids. By following the step-by-step guide, prioritizing safety, and avoiding common mistakes, you can clean up spills effectively, protect the environment, and stay compliant with EPA and OSHA guidelines. Remember: the key to successful spill response is preparation—keep your oil spill kit stocked, accessible, and inspected regularly, and train your team to use it correctly.
Whether you need oil absorbent pads for small drips, oil absorbent boom for marine spills, or a complete oil spill kit for your facility, having the right products is essential. If you’re unsure which oil spill kit or absorbent products fit your needs—whether you’re a small auto shop or a large marina—our team of experts can help you select the best solutions to keep your workspace safe and compliant. Reach out to learn more about our high-quality oil absorbent products and how they can support your spill response efforts.